


You’ve made it through assembling your winning team, deciding on your property type and must-haves, and now you’re ready to draw up an official offer. Part 1 of this series has prepared you for this very crucial point in the home buying process. Using the knowledge of the NYC real estate landscape from Part 1, let’s dive into what crafting an offer in this type of market looks like.
THE OFFER
The offer is the most critical part of the buying process. Below are the same gems I share with my clients as it pertains to crafting the best offer in any kind of market.
Step 1: Take the seller’s temperature. Before you submit an offer, first understand the Seller’s motivation. This is also why you want to have a Buyer’s Agent early on in the process—while you’re looking at places and getting a feel for things, your Buyer’s Agent is connecting with the listing agent to gather intel so your offer will be received in the best way possible. For example, if it’s revealed that a good offer includes the ability for the Seller to do a post-closing occupancy (and you’re ok with it), your offer should reflect that. Ditto for any other substantial pain points the Seller may have that you can address outside of the price itself.
Step 2: Get familiar with the comps in the area. Real estate comparables (“comps”) are recently sold homes that are similar to the property you’re trying to purchase. I would say that this is now divided into 2 buckets (pre-covid and post-covid)—anything sold pre-covid, I would personally disregard. Use post-covid ‘in-contract’ and sold comps to determine the right place to start the conversation. Again, something your Buyer’s Agent can assist you with.
Step 3: Determine what the property is worth to you. This is the real number, aka your “walk-away number.” Aside from comps, does this property check all of the boxes? Are your must-haves covered? A home is worth what a buyer is willing to pay for it, so when you can say, “I’m okay going up to ‘x’ number and if the bidding goes higher than that, I’m okay losing it” that’s when you’ve arrived at your walk-away number.
Step 4: Consider contingencies. My motto here is “less is more,” as a Seller will typically prefer and prioritize a clean deal (with no hair on it i.e. excessive contingencies, seller concessions, etc). However, if you’re in a Buyer’s market, standard contingencies are ok (i.e. financing & inspection).
Step 5: You get a counteroffer—recognize the signal. This is where you get to see where your offer stands. For instance, if a property is $1.5m and you offer $1.2m and the Seller isn’t highly motivated, two things can happen: 1) you don’t get any response or counter-offer (which is a huge signal that you’re way too low) or 2) you get a tight counter where the seller asks for $1.490, which signals that you need to come way up to continue the conversation. It’s really important for both sides to appreciate what is being communicated during a counter-offer. This is also where your walk-away number comes in handy, as you can save yourself a lot of heartache if you know beforehand how far you’re willing to go, to prevent yourself from getting swept up in emotional buying.
Step 6: You receive an accepted offer. This is exciting, however it’s not binding until a contract is signed by both parties. An accepted offer means that “we can keep talking”—at this moment we’ve agreed to your terms, we’re going to allow you to do an inspection, and we expect you to move quickly. You are not safe until the contract is signed (almost always the listing agent will continue showing the property until the contract is signed). You may just be the best offer at the moment—there can always be another buyer that comes along and offers more money and/or better terms than you, which is why too much time passing is the killer of all deals!
Step 7: Time for an inspection. My recommendation is that every property should be inspected (in certain instances, larger co-ops can be exempt). For a resale, the property is being sold “as is” and the carve out is the appliances should be in good working order and there shouldn’t be any active leaks present, to name a few. Things are different for a unit in a new development because you are inspecting a product that is newly constructed. Now, you are looking to verify that every “i” has been dotted and “t” crossed through the use of a punch list. Note that there will be at least 30-50 things that your home inspector may add to the list (this is expected), however that doesn’t mean that you should bring all 50 things to the Sponsor (developer). Make sure to consult with your Buyer’s Agent and inspector to review the hot-ticket items and only share the critical items—this will keep you in the “clean deal” arena.
Pro-Tip: Break your punch list up into critical, health & safety, and cosmetics.
The best position for you to be in as a buyer is to have an inspector and an attorney ready on standby when you get the feeling that your offer may be accepted. Once that happens, you can say “Awesome. I have my attorney ready and I can inspect tomorrow. Are you available?”
Step 8: Both parties sign the contract. Most deals require a 10% deposit which is remitted with the signed contract. The money will stay in the Seller’s attorney’s escrow account until the closing. Remember, nothing is binding until both parties sign. You sign first, and then the seller signs.
IN-CONTRACT WHAT’S NEXT?
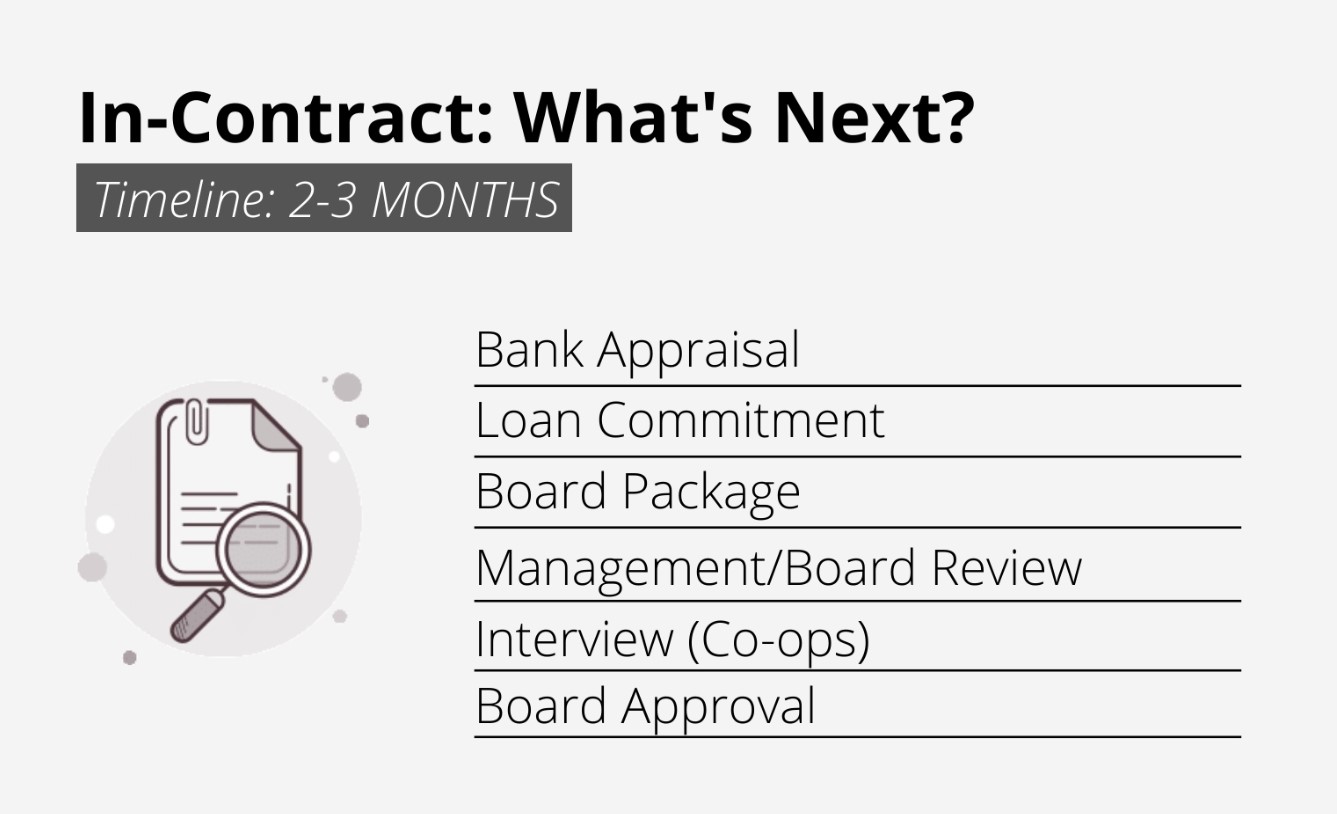
This phase of the process typically takes between 2-3 months (However, all-cash deals move faster)
First, you’ll have a bank appraisal. Don’t worry, you’re not involved with this. Your Buyer’s Agent will tour the property with an appraiser (3rd party) who will visually inspect the property and take pictures. Don’t worry, they’re only looking for proof that the place exists in the condition as represented. Your Buyer’s Agent will provide comps to the appraiser to support the price you agreed to pay.
Second, in 30 days or less, you’ll get a loan commitment. This is where it gets serious. The pre-approval is just “we think we’ll loan you the money” and a loan commitment is “alright, we’re going to loan you the money.”
Third, (for co-op or condos), while the aforementioned is in process, you’re going to fill out a Board Package (purchase application). It can feel a bit overwhelming with all of the detailed information that’s required. Not to worry, your Buyer’s Agent will assist you in preparing it and ultimately submitting it to the building’s managing agent for review (i.e. bank statements, tax returns, reference letters, etc.).
Fourth, (for co-op or condos), the managing agent will review your board package. This is a pretty rigorous process that can be completed in a week or as long as a month’s time. Note: It’s important to find out when the Board meets, so you can time the submission of your package to coincide with that meeting. Otherwise, you could find yourself tabled to the following month’s Board meeting.
Fifth, (for co-op or condos), once you pass muster with the managing agent, your package is forwarded to the board for review and an eventual interview. Your Buyer’s Agent will run you through the basic do’s and don’ts. Just remember, less is more. Answer the questions politely, and succinctly. Don’t ask questions, save them for your Buyer’s agent. Also, dress appropriately and be early if it’s in person.
Sixth and final, (for co-op or condos), after a successful interview, you will get a board approval. Do not ask in the interview if you’ve been approved! Typically, an approval from the Board will be sent to the managing agent in a couple of days.
CLOSING: THE FINISH LINE
Take a deep breath, you’ve made it to closing! This phase of the process typically takes between 2-4 weeks.
First, you’ll get a notice that the bank has cleared to close. This means that the bank has made all of their last-minute checks and internal calls and are ready to officially move forward with the deal.
Second, you set your closing date. This happens when the bank gives you that green light and it’s coordinated between attorneys when everyone is available.
Third, you schedule your final walk-through. For a re-sale, the final walk-through is where you confirm that everything is as you remember it, typically, conducted the same day as closing or the day before. If you purchased in a New Development, you’ll reference the punch list to verify that all ‘agreed-to-fixes’ have been completed. If they haven’t, there are certain remedies that your Buyer’s Agent can negotiate for you.
Fourth, you officially close on your new property. Warning, you may experience lots of hand cramping from all of the pages that require your initials or full signature. What a great problem to have! You will receive keys upon officially closing or they may be with the doorman of your building, if applicable.
Fifth and final step is to celebrate in whatever way you know how! Pop a bottle of champagne (or soda water for my non-drinkers), indulge in some sweets, whatever helps you take in this very special moment of owning your own property. It’s been a long road, and if you’ve partnered with the right Buyer’s Agent, it should have mostly been a smooth ride.
CONCLUSION
There you have it—the full rundown of the home buying process in our current NYC real estate market. It’s been a whirlwind and surely a lot to digest in this 2-part series. But the good news is you don’t have to do this alone—the home-buying process is meant to be executed with a winning team (refer back to part 1 “Who’s Your Team” section for a refresher) and I would love to be a member of your team. Let’s work together!
LET’S TALK TO SEE IF I’M A GOOD FIT.
I’m known as The Buyer’s Advocate with a team ready to help you in this ever-changing market. My motto: Hands-on, heart on, wisdom on. Let’s connect: aaron(at)teamcarteblanche(dotted)com.